Wednesday, June 13, 2012

Day 3: Paper Puppets


Summary of the Day:
 I loved this shortened version of the reading.

I finally decided on my visual metaphor. As a teacher I want to be like a river guide. I might know the route, but I certainly can't prepare for everything or see everything that will come my way or my students way and I definitely can't row our raft and steer without their help. I am a guide, but I can't make us go anywhere without everyone's cooperation.

Learning occurs when I guide my students to their own answers, not when I spoon feed them facts.

Today in class we focused on making paper puppets with movable joints. I am a little gluingly challenged so my puppet struggled its way to paralysis as the glue dried, but you can't tell from the picture.


This was a sweetly simply process.

First, cut out shapes for the different body parts in cardstock or a recycled file folder. I chose triangles for feet and legs, half moons for arms, a trapezoid for a skirt, a rectangle for a robot like midsection, and a long skinny neck with a diamond for a head on top!

Next, use a nice hole punch to punch holes in the tops and bottoms of the body parts. I say "nice" hole punch because the sticky and dull ones can crinkle/rip the paper.

Third cut out small dime sized circles of file folder paper. Arrange the joints so that all the holes that you punched are covered by another body part.

Fourth, get some white Elmers glue and squeeze a good amount onto a piece of paper. Using a toothpick apply a small drop or two of glue into the holes and cover with a paper circle. Using the eraser of a pencil, press down only on the center of the paper circle and hold for 30 seconds. Move your joint around to make sure it worked.

To create awesome faces or other designs on the puppet try using a Chartpak "blender" pen to rub an image of a celebrity or other onto your paper puppet. cutout the image you want, place it on the puppet and arrange it how you want, and then color over it with the chartpak pen until the image begins to look really dark.

We also discussed some social practice artists and their methods. I was quite taken with the  Camouflage  artists but I was also really touched by the Vik Muniz film "Wasteland and his artwork depicting people who live off landfills in Brazil


Extensions: The important take away from a lesson like this is that art is an experience! I want my students to go out and have an art experience.

Applications:
 In the classroom we could arrange our paper puppets together to show that we are a community of learners and that everyone is included. Another application that Dr. Barney mentioned, which I love, is Flat Stanley! Flat Stanley is socially engaged art and who knows where a flexible Flat Stanley could go. I remember as a little girl sending my Flat Stanley to Tokyo Japan where my uncle lived and being amazed at the pictures that were mailed back. I wish I still had them! I want my students to have experiences like that to help them see how big and diverse the world is.


Day 2: Make a Mark!


Summary: 
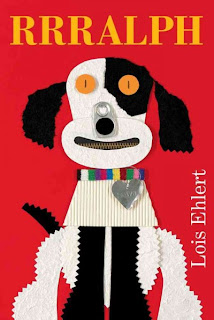
We looked at some different types of illustration in children's books like found objects in RRRalph by Lois Ehlert, different textures and metaphorical media in Seven Blind Mice by Ed Young, and some different perspectives and contexts in Zoom by Istvan Banyai.


We talked about four concepts in art making... MEDIA/MEDIUM, PROCESS, GROUND, and SUPPORT. We went on a scavenger hunt to find different ways to make a mark with different objects. 


Media:

lipgloss, fork, makeup, bubbles, eraser dust, shoe, gum, yellow leaf berry, gum, rip, stapler, marker dust, tomato sauce, coin mark, fingerprint, tire, money, orange peel, push pin, teeth, dirt, windex

Processes:

kiss, stab, rub, submerge, dust it, chew up gum and spit it, splatter, squash, tear, staple/puncture, scratch, bite

Grounds:

paper, plastic wrap, plate, window, gesso, canvas, foil, fabric, face, cement,

Support:

podium, wall, building, table, chair, stool, stand, brick, easel, window pane, ground
An interesting question is posed by the work of  Kumi Yamashita: Can light or shadows act as a medium? After looking at her word, my immediate answer was YES! I was so impressed by these shadows!


Something that stuck out to me was when Dr. Barney told us that the color wheel is only one way for us to access truth about color! We talked about the primary colors red, yellow, and blue and compared them to other color systems like CMYK, Lab Color, Index Color, and RGB.

The discussion on Formalism is what really hit home for me. This kind of art that evokes emotion through color, shape, size really resonated with me. When I was creating a prototype for my Instrumentalist Presentation, I ended up using a lot of these ideas to guide me as I put together found object art.


Extension:

 These formalist principles can be applied to evoking emotion in art (Expressionism) as well as to teaching lessons or morals through art (Instrumentalist). In a classroom I would certainly want to show PDF Presentation called "Picture This" where Molly Bang talks about the decisions that guide art. I love thinking of a process as series of decisions because it means that our art is meaningful, though out, and deliberate. 


Application:

As I mentioned previously, I used these same principles in a found object art prototype that I created. In my classroom, I want to teach different media, grounds, supports, and artistic decisions through a found object art assignment. My students would have to follow these guidelines that would be creative restraints to enhance the creativity rather than to stifle it.

1. As a class we will go on a nature walk. Choose 11 found objects of any kind. You must have at least 3 different objects in differing quantities that add up to 11. 
2. You can decide what objects to use, how to arrange them, and how to present them (glue it, photograph it, tape it, etc.) based on what kind of emotion that you want to convey. 
3. Your art decisions must be geared toward evoking a certain emotion or teaching a lesson or a moral. 
This is an example of a found object piece that I created. I have annotated each item to explain the artistic decisions I made about shape, size, color etc. Lastly, because I created a piece that was supposed to represent childhood, I chose to photograph the image rather than gluing it down to imitate the impermanence of childhood.

Day 1: Socially Engaged Art

What We Did Today:

First, I marked some of the concepts and projects that I wanted to learn about in the class. Some of the things I was interested in were learning to draw and paint more realistically.

Next, we introduced ourselves by using candy... Because I hung back and waited for everyone else, I ended up getting a 100 Grand, which I like, but not as much as some of the other candies. I described myself as being caught in sticky situations frequently (mostly caused by my poor habit of procrastination) and slightly nutty (although, 100 grand doesn't really have nuts).


The image I chose had people from an earlier era dancing, eating, and walking around at a picnic like event. They were small and the painting was mostly of the sky and the tall trees. The pictures was somewhat fuzzy due to the brush strokes and the colors that were used. I felt that this described me because I don't always know my way, I am introspective and constantly thinking, "What is the big picture?", and I often feel small as only one insignificant person in this great big world.

Lastly, we talked about Felix Gonzalez-Torres... and his socially engaged artwork. He lost someone dear to him and to remember him, he used the individual's favorite candy to make a pile that weighed exactly as much as his loved one had weighed before he became ill and passed away. We also talked about his generosity as an artist. He invites people to take a sample of the candy and to reflect on their own experiences.

My students could benefit from learning about artwork like this because it would help them see that art is usually based more on process and meaning than just what it looks like when its done. Most people think art and visualize paintings like the Mona Lisa. Socially engaged art is a way for kids to begin thinking outside the box about art. Its a way for them to see that they can be artists if they have ideas and that they don't necessarily need specific skills like drawing, painting, sculpting etc. to be great artists.


We talked about Arthur Wesley Dow and how the elements and principles help us talk about some forms of art as a "composition"... very similar to music. We talked about Line, Shape, Color, Texture, and Value, as well as types of Balance, Proportion, Rhythm, Harmony, Unity, Emphasis, etc.


Extension:
 I loved this video because it shows children how art can be more about the process and the medium than the finished product. This video highlights an artist who performs everyday activities as part of her artwork. 


Classroom Application:


What I really pulled away from class today was the fact that anybody can be an artist. I had never seen art like Felix Gonzalez Torres before and I know it really opened my mind about what can be considered art. In my classroom, I want to present a lesson about art that is outside the box and then let my students come up with their own socially engaged artwork, as we did. It's important for students to recognize art as an experience rather than a finished product. 


For my socially engaged artwork, I wanted to experience what it would be like to navigate through life if I didn't speak the mainstream language or belong to the mainstream culture. I visited family owned restaurants on Center Street where I was the only English speaker and tried to order from the menu. I also went to grocery stores, pharmacies, libraries, and stores to see what products would be available to me. I took pictures of my experience and documented it.